Amazing Science Experiments
You can also visit me on http://www.pinterest.com/guylainelabbe/ .There are lots more Science Ideas and so much more.
Introduction to Scientific Observation: Dancing Raisins
Introduction to Scientific Observation: Dancing Raisins
Material:
5 Raisins
Club soda or other clear soda. (I suspect using Champagne could make clean up time a lot more fun for the adult. )
Beaker or other clear container.
Paper and pencil (optional).
Procedure:
Help your tot fill the beaker with soda water and set the raisins on a plate.
Allow your tot to drop the raisins into the beaker and watch what happens.
Keeping in mind that observation is an important part of the scientific method, ask your tot to describe what she sees. Optionally, use the paper and pencil to record your tot’s observations.
If your tot is interested, discuss why the raisins are “dancing”.
Discussion:
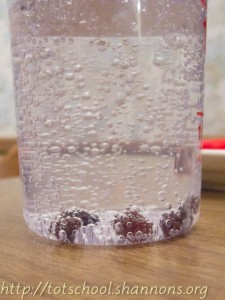
So just why are the raisins “dancing”? Carbon dioxide is forced into the soda to make it “carbonated”. The carbon dioxide can easily come back out of the soda and it does so as little bubbles on the raisins. The raisins are more dense than the soda so they immediately sink when dropped into it. However, when enough bubbles of carbon dioxide cling to a raisin, it is lifted to the surface of the soda. As soon as the bubbles reach the surface, the carbon dioxide is released into the air and the raisin (which is no longer held up by the bubbles) sinks back to the bottom. Eventually too much of the carbon dioxide will escape from the soda and there will not be enough left to form on the raisins and raise them to the surface.
Below is a video of the dancing raisins.
http://totschool.shannons.org/?p=5665
VIDEO-http://youtu.be/_1I345ZFUu4
Material:
5 Raisins
Club soda or other clear soda. (I suspect using Champagne could make clean up time a lot more fun for the adult. )
Beaker or other clear container.
Paper and pencil (optional).
Procedure:
Help your tot fill the beaker with soda water and set the raisins on a plate.
Allow your tot to drop the raisins into the beaker and watch what happens.
Keeping in mind that observation is an important part of the scientific method, ask your tot to describe what she sees. Optionally, use the paper and pencil to record your tot’s observations.
If your tot is interested, discuss why the raisins are “dancing”.
Discussion:
So just why are the raisins “dancing”? Carbon dioxide is forced into the soda to make it “carbonated”. The carbon dioxide can easily come back out of the soda and it does so as little bubbles on the raisins. The raisins are more dense than the soda so they immediately sink when dropped into it. However, when enough bubbles of carbon dioxide cling to a raisin, it is lifted to the surface of the soda. As soon as the bubbles reach the surface, the carbon dioxide is released into the air and the raisin (which is no longer held up by the bubbles) sinks back to the bottom. Eventually too much of the carbon dioxide will escape from the soda and there will not be enough left to form on the raisins and raise them to the surface.
Below is a video of the dancing raisins.
http://totschool.shannons.org/?p=5665
VIDEO-http://youtu.be/_1I345ZFUu4
What makes Bread Rise?
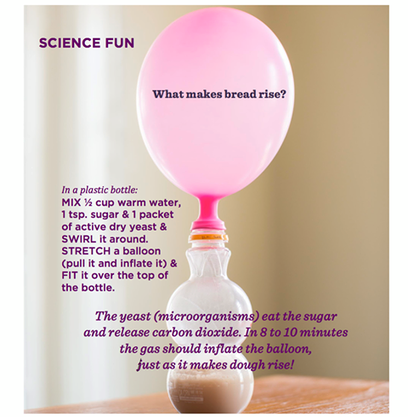
By Familyfun.com
Sun Prints
Sun Painting
Place various shaped flat objects on a dark piece of construction paper. The cheep construction fades easily. You can cut out shapes and designs or use common objects like a ruler or key. Place paper in direct sunlight for a few hours. Show children how the sunlight faded the paper, leaving dark silhouettes. Use objects and shapes pertaining to your theme.
Place various shaped flat objects on a dark piece of construction paper. The cheep construction fades easily. You can cut out shapes and designs or use common objects like a ruler or key. Place paper in direct sunlight for a few hours. Show children how the sunlight faded the paper, leaving dark silhouettes. Use objects and shapes pertaining to your theme.
Germs
Preschools hear about germs but they really can't understand germs because we can not see them. Here are some great ways to explain Germs to Preschoolers and very young children. I also made a hand (traced my own) and wrote on it " If you cough and if you sneeze, won't you please use one of these." and you stick it onto your tissue box. Every time we get a tissue we read it and some they are sying it.
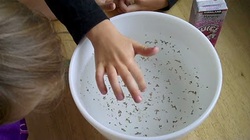
Pepper:
In a bowl of water, sprinkle some black pepper to represent germs. The pepper will float on top of the water. Discuss the importance of hand washing, using soap and water. Add a drop of dishwashing liquid into the center of the bowl, and watch the soap "scare the germs away"!
Pom Pom Germs:
This one is cute and silly and it sure to make all the kids laugh out loud.
Create your own little germs. Take a bunch of pom pons and glue 2 eyes on each pom pon to make it look like a little face. While teaching about how germs are spread, take the little pom pons in your hand but kind of hide them so the children don't know that the "germs" are in your hand. While you are talking pretend to sneeze and throw the "germs" on the children. This shows how the germs fly when you sneeze without covering your mouth. The children love this!
Healthy Bodies - Science Idea:
Using a funnel, dump some confetti to an un-blown balloon before demonstrating this to the kids. Talk to the children about germs and how important it is to cover your mouth when you sneeze. As a group, have everyone pretend that they are going to sneeze (Ah, ah, ah, CHOO!), making sure that everyone covers their mouth as they sneeze. Now explain that you are going to show them what happens when you don't cover your mouth when you sneeze. Blow up the balloon, as the children say "Ah, ah, ah"; when you get to the "Choo" part, let go of the balloon. It will deflate, flying through the air with the confetti spilling every where. Explain to the children that the confetti represents germs, and that when we don't cover our mouths when we sneeze, our germs are flying everywhere.
Materials: glow in the dark paint (neon) and black light
Put paint in child's hands and have them rub their hand together (inside & out. Next turn out the lights and use the black light. There hands will glow! Tell them "It is germs. Now we are going to wash our hands to get rid of the germs." Wash hands, then turn out the lights. They can see where they missed the germs.
You could also only paint one child's hands and have that child touch everyone else's hand. Then shut ff the lights an using the blck light see who got paint on them. Explain that the paint is the germs and that is how quickly and easily germs can spread.
How Do Germs Spread?
Do you get told to wash your hands after playing outside or using the bathroom, even when there isn't any dirt on them? Try this experiment to see why you should wash your hands, even if they look clean!
What You Will Need:
Hand lotion
Glitter
Sink or large bucket
Paper towels
Soap
Water
A helper
What To Do:
Put a drop of lotion on your hands and rub them together to spread the lotion out evenly.
With your hands over a sink or large bucket, have your helper put a pinch of glitter in the palm of one of your hands.
With your hands still over the sink, make a fist with the hand that has glitter on it, then spread
Check out all the coolest Preschool Science Ideas here:
top 10 simple preschool science
water experiments
home made rocket science
slimy slime
soap and pepper
dancing raisins
volcanic eruptions
celery and circulation
invisible ink
sprouting beans
mangetic fun
preschool fire safety activities
apple preschool activities
sprouting beans
5 senses Preschool Activities
dinosaur preschool activities
water preschool activities
rhinoceros preschool activities
Volcano
Volcano!
Place an empty baby food jar on a tray. Surround the jar with playdough. Form the dough to look like a mountain. Put a drop of red food coloring and a tablespoon of baking soda in the jar. Then add some vinegar to it to make it erupt.
http://www.childcarelounge.com/activity/science-experiments.php
Place an empty baby food jar on a tray. Surround the jar with playdough. Form the dough to look like a mountain. Put a drop of red food coloring and a tablespoon of baking soda in the jar. Then add some vinegar to it to make it erupt.
http://www.childcarelounge.com/activity/science-experiments.php
Celery and Food Coloring
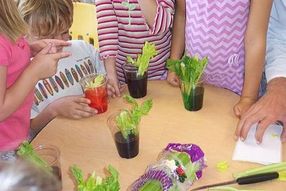
Celery and Food Coloring
"Celery science" is a cool preschool science project that you can use to introduce your kid about human blood system.
what you need:
celery stick, 2 glasses, food coloring, water
Procedure :
1. First, use a knife to carefully trim the end of the celery stalk.
2. Then, fill a glass with water and add a few drops of food coloring.
3. Now put the celery stalk into the glass of colored water.
4. You'll soon see the water travel up the veins of the celery stalk.
Now for more fun,
Try this again but use two glasses of differently colored water.
Split about 1/3 of the celery stalk in half. Place each half into the two glasses of colored water.
The stalk will start to change to the same color as the water it was in.
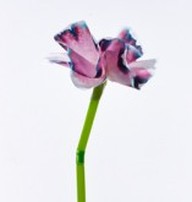
You can try the same steps with white carnations, and you can get the blooms to turn into two different colors!
But note that it takes a few hours to change colors.
The scientific explanations :
A celery vein is a simple way to think of the human blood system. Celery veins transport, or carry, water and nutrients in the plant. Blood is transported in a similar manner in the human body.
Something for the kids to think about!
http://www.amazing-preschool-activities.com/preschool-science-celery.html
"Celery science" is a cool preschool science project that you can use to introduce your kid about human blood system.
what you need:
celery stick, 2 glasses, food coloring, water
Procedure :
1. First, use a knife to carefully trim the end of the celery stalk.
2. Then, fill a glass with water and add a few drops of food coloring.
3. Now put the celery stalk into the glass of colored water.
4. You'll soon see the water travel up the veins of the celery stalk.
Now for more fun,
Try this again but use two glasses of differently colored water.
Split about 1/3 of the celery stalk in half. Place each half into the two glasses of colored water.
The stalk will start to change to the same color as the water it was in.
You can try the same steps with white carnations, and you can get the blooms to turn into two different colors!
But note that it takes a few hours to change colors.
The scientific explanations :
A celery vein is a simple way to think of the human blood system. Celery veins transport, or carry, water and nutrients in the plant. Blood is transported in a similar manner in the human body.
Something for the kids to think about!
http://www.amazing-preschool-activities.com/preschool-science-celery.html
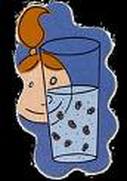
Dancing Raisins
Preschool Science
Dancing Raisins
Another simple preschool science experiment that you can try tonite !
It is a really fun to see the raisins go bippity-boppity-boo!
This is another great idea to add to any party fizzy drinks!
what you need:
clear glass which is tall, some raisins, fizzy club soda
Procedure :
1. Pour in some club soda into a glass
2. Drop in half a raisin
3. wait for about 30 seconds
Now for the fun part,
4. Watch the raisins dance!
The scientific explanations :
The reason why the raisin floats to the top is because the bubbles stick to the irregular sides of the raisin and make the raisin more buoyant.
Once the raisin reaches the top, it looses some of its air bubbles, causing it to sink .
Then the bubbles start to stick to the raisin again and the cycle repeats
-"Buoyant" means that something floats more easily.
-The bubbles make the raisin float the way a life jacket makes a person float.
http://www.amazing-preschool-activities.com/preschool-science-soda-raisin.html
Popcorn Dance
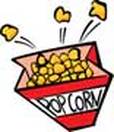
Popcorn Dance
Fill small a glass jar 3/4 full of water. Mix in 2 tablespoons of baking soda and mix well. Add a drop or two of food coloring and 10 to 15 popcorn kernels. Then add a few drops of vinegar. The kernels will start to move in one or two minutes.
http://www.childcarelounge.com/activity/science-experiments.php
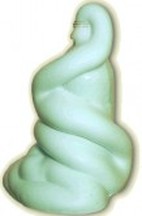
Science Experiments: Dr. Seuss's Oobleck
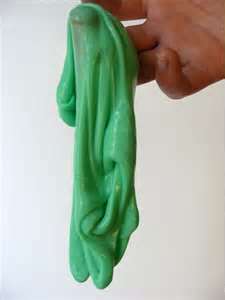
Use this with your Dr. Seuss Theme.
What You'll Need:
Water
Cornstarch
Large bowl
Food coloring
What To Do:
1. Put 1 cup of water and 1½ cups of cornstarch in the bowl and stir to combine. Add food coloring.
2. Notice that the harder you try to stir, the more difficult stirring becomes. (Slowly add more cornstarch if the mixture is too thin.)
3. Stop stirring and quickly poke the oobleck with your finger. Notice that it feels solid.
4. Slowly dip a finger into the oobleck. Now it feels like a liquid!
5. Take some oobleck and roll it into a ball. Keep rolling, because when you stop, it’ll melt before your eyes!
What’s Happening:
Oobleck is a substance, like quicksand, that acts like a solid sometimes and like a liquid other times. That’s because cornstarch is made up of many molecules. When left alone, the molecules spread apart in the water. But when you apply pressure, the molecules squish together, and the mixture feels like a solid (so you can roll it into a ball). When you stop squashing those molecules, they spread back out and move through the water like a liquid again. If you threw some oobleck at the wall, it would hit the wall, bounce off, and then ooze into a puddle. Wild!
http://www.scholastic.com/parents/resources/article/science-nature-activities/home-science-experiments-dr-seusss-oobleck
Science Experiments: Elephant's Toothpaste (By Scholastic.com/sciene-experiments)
What You'll Need:
A clean 16-oz plastic soda bottle
1/2 cup 20-volume hydrogen peroxide liquid (20-volume is a 6% solution, ask an adult to get this from a beauty supply store or hair salon)
1 Tablespoon (one packet) of dry yeast
3 Tablespoons of warm water
Liquid dishwashing soap
Food coloring
Small cup
Safety goggles
What To Do:
Note: As you can see from the picture, foam will overflow from the bottle, so be sure to do this experiment on a washable surface, or place the bottle on a tray.
1. Hydrogen peroxide can irritate skin and eyes, so put on those safety goggles and ask an adult to carefully pour the hydrogen peroxide into the bottle.
2. Add 8 drops of your favorite food coloring into the bottle.
3. Add about 1 tablespoon of liquid dish soap into the bottle and swish the bottle around a bit to mix it.
4. In a separate small cup, combine the warm water and the yeast together and mix for about 30 seconds.
5. Now the adventure starts! Pour the yeast water mixture into the bottle (a funnel helps here) and watch the foaminess begin!
What's Happening:
Foam is awesome! The foam you made is special because each tiny foam bubble is filled with oxygen. The yeast acted as a catalyst (a helper) to remove the oxygen from the hydrogen peroxide. Since it did this very fast, it created lots and lots of bubbles. Did you notice the bottle got warm? Your experiment created a reaction called an exothermic reaction, which means it not only created foam, it created heat! The foam produced is just water, soap, and oxygen, so you can clean it up with a sponge and pour any extra liquid left in the bottle down the drain.
The experiment can also be done with the hair care version of hydrogen peroxide, or the weaker pharmacy version, although the effect with the pharmacy version will be smaller. Readers should use safety goggles for any experiment, and should have parents read instructions on containers for safety precautions.
http://www.scholastic.com/parents/resources/article/science-nature-activities/home-science-experiments-elephants-toothpaste
Science Experiments: Flower Rainbow (By Scholastic.com/sciene-experiments)
What You'll Need:
Cereal bowl
2 Popsicle sticks (you could also use straws or twigs from the backyard)
White coffee filter
Scissors
Black washable marker (Crayola and RoseArt produce best results)
Piece of paper towel (about 3" x 3")
What To Do:
1. Fill the bowl about halfway with water.
2. Balance the Popsicle sticks horizontally across the bowl with a small space (about 1.5") between them.
3. Snip a small hole in the center of the coffee filter.
4. Using the marker, draw six small dots, evenly spaced, around the hole. Each dot should be about 3/4" from the hole. Add more dots if you’d like.
5. Tightly roll or twist your paper towel so that it’s like a rope and thread it through the hole in the coffee filter.
6. Balance the coffee filter on the Popsicle sticks so that the open end of the filter faces up toward the ceiling and the end of the paper towel rope coming out of the bottom of the filter just touches the water.
7. Watch for 1 to 3 minutes as colors begin to swirl out of the black dots on the coffee filter!
8. To make a flower, trim the excess paper from the filter. Pinch in the middle, then tape to a straw, pipe cleaner, or twig.
What’s Happening:
The paper towel rope absorbs water from the bowl and carries it up to the coffee filter. The filter absorbs the water, and the water molecules spread through the paper. When the water hits the black dots, it grabs the different-colored molecules that make up the black ink (yep, black isn’t made from just one hue!) and carries them as it keeps moving through the filter. That’s why you see a rainbow form when the ink molecules separate. Like the ink, many things in our lives (beverages we drink, lotion we put on our skin) are mixtures of various substances. When we separate the different components, it’s called chromatography.
http://www.scholastic.com/parents/resources/article/science-nature-activities/home-science-experiments-flower-rainbow
Science Experiments: Eggs in Space (By Scholastic.com/sciene-experiments)
What You'll Need:
Fresh (tap) water
Regular salt
Three large clear glasses (at least 16 oz)
1 raw egg, right out of the fridge, still in the shell
Food coloring (optional)
What To Do:
1. Create a solution of salt water by stirring 2 tablespoons of salt into 8 ounces of water in a glass. Add a few drops of food coloring.
2. Gently place the egg in the glass and notice that it floats. (If it sinks, add more salt.)
3. Fill another glass a little less than halfway with regular water. Add a few drops of a different color.
4. Move the egg from the salt water to the fresh water and watch it sink.
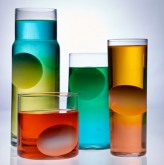
5. Put the egg aside and slowly pour the fresh water on top of the salt water. Tilt the glass of salt water as you pour so that the salt water and fresh water don’t mix.
6. Slowly drop the egg into the glass and watch as it falls through the layer of fresh water and stops on top of the salt water.
What’s Happening:
You’re seeing density in action. Density is the amount of matter (the science word for stuff) that you can pack into a certain amount of space. Things that are denser than water sink; things that are less dense float. Adding salt to water makes it denser. The egg hovers between the two layers because the egg is less dense than the salt water but more dense than the fresh water. Have you heard the riddle, “Which weighs more, a pound of feathers or a pound of bricks?” They both weigh the same: a pound! But a pound of feathers would take up more space than a pound of bricks. That’s because bricks are denser than feathers.
http://www.scholastic.com/parents/resources/article/science-nature-activities/home-science-experiments-eggs-space
Fresh (tap) water
Regular salt
Three large clear glasses (at least 16 oz)
1 raw egg, right out of the fridge, still in the shell
Food coloring (optional)
What To Do:
1. Create a solution of salt water by stirring 2 tablespoons of salt into 8 ounces of water in a glass. Add a few drops of food coloring.
2. Gently place the egg in the glass and notice that it floats. (If it sinks, add more salt.)
3. Fill another glass a little less than halfway with regular water. Add a few drops of a different color.
4. Move the egg from the salt water to the fresh water and watch it sink.
5. Put the egg aside and slowly pour the fresh water on top of the salt water. Tilt the glass of salt water as you pour so that the salt water and fresh water don’t mix.
6. Slowly drop the egg into the glass and watch as it falls through the layer of fresh water and stops on top of the salt water.
What’s Happening:
You’re seeing density in action. Density is the amount of matter (the science word for stuff) that you can pack into a certain amount of space. Things that are denser than water sink; things that are less dense float. Adding salt to water makes it denser. The egg hovers between the two layers because the egg is less dense than the salt water but more dense than the fresh water. Have you heard the riddle, “Which weighs more, a pound of feathers or a pound of bricks?” They both weigh the same: a pound! But a pound of feathers would take up more space than a pound of bricks. That’s because bricks are denser than feathers.
http://www.scholastic.com/parents/resources/article/science-nature-activities/home-science-experiments-eggs-space
Science Experiments: Color-Changing Milk (By Scholastic.com/sciene-experiments)
What You'll Need:
Milk (whole or 2%)
Dinner plate
Food coloring (red, yellow, green, blue)
Dishwashing soap (Dawn brand works well)
Cotton swabs
What To Do:
1. Pour enough milk in the dinner plate to completely cover the bottom to the depth of about 1/4". Allow the milk to settle.
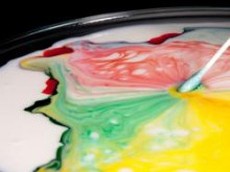
2. Add one drop of each of the four colors of food coloring — red, yellow, blue, and green — to the milk. Keep the drops close together in the center of the plate of milk.
3. Find a clean cotton swab for the next part of the experiment. Predict what will happen when you touch the tip of the cotton swab to the center of the milk. It's important not to stir the mix. Just touch it with the tip of the cotton swab. Go ahead and try it. Did anything happen?
4. Now place a drop of liquid dish soap on the other end of the cotton swab. Place the soapy end of the cotton swab back in the middle of the milk and hold it there for 10 to 15 seconds. Look at that burst of color! It's like the 4th of July in a bowl of milk!
5. Add another drop of soap to the tip of the cotton swab and try it again. Experiment with placing the cotton swab at different places in the milk. Notice that the colors in the milk continue to move even when the cotton swab is removed. What makes the food coloring in the milk move?
What's Happening:
Milk is mostly water, but it also contains vitamins, minerals, proteins, and tiny droplets of fat suspended in solution. Fats and proteins are sensitive to changes in the surrounding solution (the milk). The secret of the bursting colors is the chemistry of that tiny drop of soap. Dish soap, because of its bipolar characteristics (nonpolar on one end and polar on the other), weakens the chemical bonds that hold the proteins and fats in solution. The soap's polar, or hydrophilic (water-loving), end dissolves in water, and its hydrophobic (water-fearing) end attaches to a fat globule in the milk. This is when the fun begins.
The molecules of fat bend, roll, twist, and contort in all directions as the soap molecules race around to join up with the fat molecules. During all of this fat molecule gymnastics, the food coloring molecules are bumped and shoved everywhere, providing an easy way to observe all the invisible activity. As the soap becomes evenly mixed with the milk, the action slows down and eventually stops.
Try adding another drop of soap to see if there's any more movement. If so, you discovered there are still more fat molecules that haven't found a partner at the big color dance. Add another drop of soap to start the process again.
http://www.scholastic.com/parents/resources/article/science-nature-activities/home-science-experiments-color-changing-milk
Milk (whole or 2%)
Dinner plate
Food coloring (red, yellow, green, blue)
Dishwashing soap (Dawn brand works well)
Cotton swabs
What To Do:
1. Pour enough milk in the dinner plate to completely cover the bottom to the depth of about 1/4". Allow the milk to settle.
2. Add one drop of each of the four colors of food coloring — red, yellow, blue, and green — to the milk. Keep the drops close together in the center of the plate of milk.
3. Find a clean cotton swab for the next part of the experiment. Predict what will happen when you touch the tip of the cotton swab to the center of the milk. It's important not to stir the mix. Just touch it with the tip of the cotton swab. Go ahead and try it. Did anything happen?
4. Now place a drop of liquid dish soap on the other end of the cotton swab. Place the soapy end of the cotton swab back in the middle of the milk and hold it there for 10 to 15 seconds. Look at that burst of color! It's like the 4th of July in a bowl of milk!
5. Add another drop of soap to the tip of the cotton swab and try it again. Experiment with placing the cotton swab at different places in the milk. Notice that the colors in the milk continue to move even when the cotton swab is removed. What makes the food coloring in the milk move?
What's Happening:
Milk is mostly water, but it also contains vitamins, minerals, proteins, and tiny droplets of fat suspended in solution. Fats and proteins are sensitive to changes in the surrounding solution (the milk). The secret of the bursting colors is the chemistry of that tiny drop of soap. Dish soap, because of its bipolar characteristics (nonpolar on one end and polar on the other), weakens the chemical bonds that hold the proteins and fats in solution. The soap's polar, or hydrophilic (water-loving), end dissolves in water, and its hydrophobic (water-fearing) end attaches to a fat globule in the milk. This is when the fun begins.
The molecules of fat bend, roll, twist, and contort in all directions as the soap molecules race around to join up with the fat molecules. During all of this fat molecule gymnastics, the food coloring molecules are bumped and shoved everywhere, providing an easy way to observe all the invisible activity. As the soap becomes evenly mixed with the milk, the action slows down and eventually stops.
Try adding another drop of soap to see if there's any more movement. If so, you discovered there are still more fat molecules that haven't found a partner at the big color dance. Add another drop of soap to start the process again.
http://www.scholastic.com/parents/resources/article/science-nature-activities/home-science-experiments-color-changing-milk
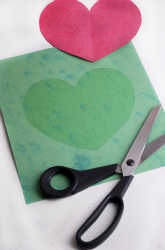
Shamrock Sprouts
I found this great article on how to grow sprouts on a sponge. We thought it would be fun to try making our own St. Patrick’s Day Chia Pets. It was so simple, and my kids loved their little shamrock sprout sponges.
To make your own Shamrock Sprouts, you will need:
A household sponge (we choose green sponges)
Seed packet (we used lettuce, spinach, and broccoli seeds)
A water mister
Shallow plate
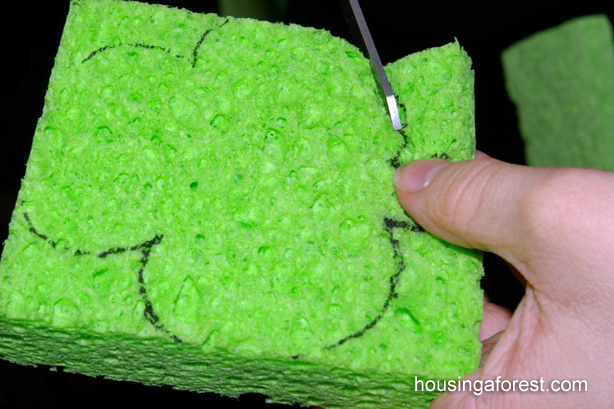
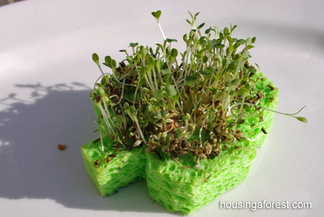
Trace a shamrock shape onto the dry sponge with sharpie. Cutting the sponge was a bit more difficult for the kids, but with perseverance they managed. We found the sponges were easier to cut when wet. Also, the kids used adult scissors because theirs were not sharp enough.
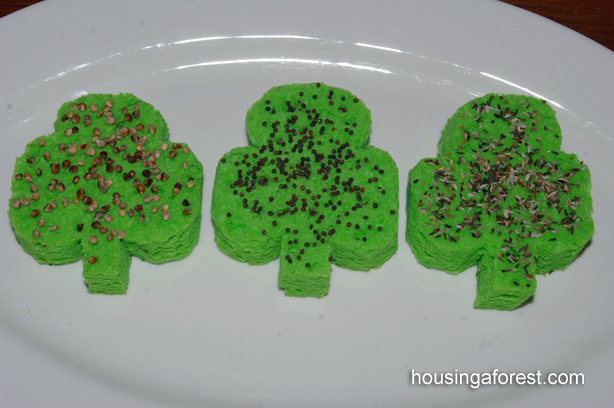
Soak the sponge once again, you want the sponge to be damp, but not dripping. Scatter the seeds across the top of the sponge, gently poking the seeds into the holes. We tried growing spinach, broccoli and lettuce seeds. Place in a sunny window. Keep the sponge moist by misting with water, don’t let the seeds dry out. We found it helpful to turn a clear plastic container over the plate at night to keep the moisture in. During the day the kids wanted to check on the progress, so we left the plastic off. Mist often with a water sprayer.
Soon you should have your very own sprout garden. I can’t wait for the snow to melt, but for now this little cheery garden will have to do. The kids loved watching their sprouts, and they thought it was interesting that seeds could grew without soil.
http://www.housingaforest.com/shamrock-sprouts/
To make your own Shamrock Sprouts, you will need:
A household sponge (we choose green sponges)
Seed packet (we used lettuce, spinach, and broccoli seeds)
A water mister
Shallow plate
Trace a shamrock shape onto the dry sponge with sharpie. Cutting the sponge was a bit more difficult for the kids, but with perseverance they managed. We found the sponges were easier to cut when wet. Also, the kids used adult scissors because theirs were not sharp enough.
Soak the sponge once again, you want the sponge to be damp, but not dripping. Scatter the seeds across the top of the sponge, gently poking the seeds into the holes. We tried growing spinach, broccoli and lettuce seeds. Place in a sunny window. Keep the sponge moist by misting with water, don’t let the seeds dry out. We found it helpful to turn a clear plastic container over the plate at night to keep the moisture in. During the day the kids wanted to check on the progress, so we left the plastic off. Mist often with a water sprayer.
Soon you should have your very own sprout garden. I can’t wait for the snow to melt, but for now this little cheery garden will have to do. The kids loved watching their sprouts, and they thought it was interesting that seeds could grew without soil.
http://www.housingaforest.com/shamrock-sprouts/